Accessing AWS using the Terminal and Secure FTP
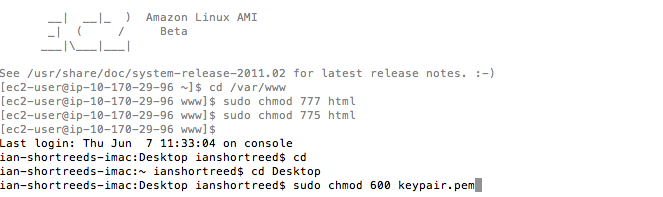
1) First, we must set the correct permissions for your keypair access file downloaded in Step 5 previously that is now sitting on your desktop. Launch Apple's terminal application located in the Applications folder or a Linux terminal window if you are on Linux and type: cd Desktop and press the return key. (this assumes that the keypair.pem has been dragged to the desktop)
Next type sudo chmod 600 keypair.pem and press the return key
keypair.pem インストール:デスクトップに移動
(permission: sudo chmod 600 keypair.pem)
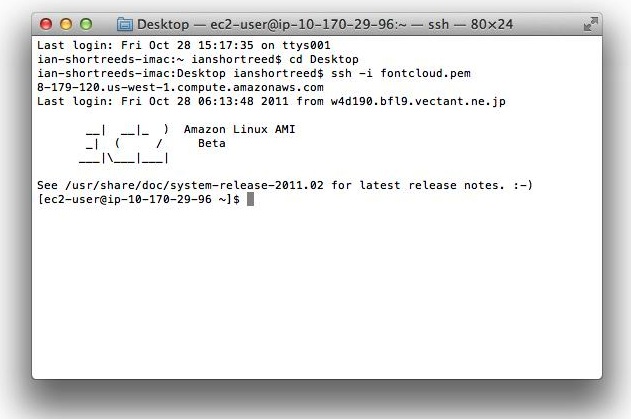
2) Next we are going to access your AWS server instance by adding the keypair.pem file at the head of the ssh command (in blue) and the actual long Amazon DNS string located in the AWS console window from where you can copy and paste the Amazon url (in red). Our command looks like this below in the terminal window with the ec2-user as the admin user name assigned by AWS (in green) and then press the return key.
ssh -i keypair.pem ec2-user@ec2-10-12-129-111.us-west-1.compute.amazonaws.com
ターミナルウィンドウにAmazon AWS ssh url を入力して下さい:
AWS Linux: ssh -i keypair.pem ec2-user@ec2-10-12-129-111.us-west-1.compute.amazonaws.com
3) Now we are inside your AWS instance. You may need to install Apache or you may not need to if it is already installed. You can test very easily if it is installed by typing:
sudo service httpd start (and press return key)
If you get an error then you need to install Apache. If Apache is not installed run these two commands in the terminal:
yum install httpd
yum install httpd-devel
ウェブサーバー に(apache)インストール:
yum install httpd
yum install httpd-devel
4) Lets copy a basic index.html file (in purple) using a secure ssh command to the top level of our server as a
welcome start-up page:
scp -i keypair.pem index.html ec2-user@ec2-23.17.52.234.us-west-1.compute.amazonaws.com:
webページ:index.html をサーバーにコピー:
5) Now we are going to move the index.html file to the html folder which is at this pathway (/var/www/html) where it will be correctly served using the move (mv) command to place the file in the proper directory path (in red):
sudo mv index.html /var/www/html/
index.html を www ディレクトリに移動:
sudo mv index.html /var/www/html/
You can test to see if the welcome index page appears by typing in your new GoDaddy URL once we start the server in Step 8 below (the server has still not been started).
com 登録: http://www.godaddy.com (900¥/1年)
AWSの elastic URL に設定して下さい (i.e www.tadgtalks.com -> http://23.17.52.234)
6) Using ssh to copy files to your server is time consuming and a hassle so we are going to fire up an FTP client like Transit again to do this. But we will first have to set the permissions on the html folder to full access. Remember to set this back to 755 once you are finished uploading files.
cd /var/www/
sudo chmod 777 html
FTPクライアント: Transit (Mac) Filezilla (Linux) - : chmod 777 ディレクトリ
7) Lets now start our AWS server using this Apache command:
sudo service httpd start
(note to stop the server we type: sudo service httpd stop)
サーバーをスタート: sudo service httpd start
8) Now we can test to see if our server is actually running by testing that Godaddy url we received earlier:
http://tadgtalks.com
Hopefully you will see your index page uploaded in Step 5 above.
サーバーテスト: ブラウザーにhttp://.tadgtalks.comを入力
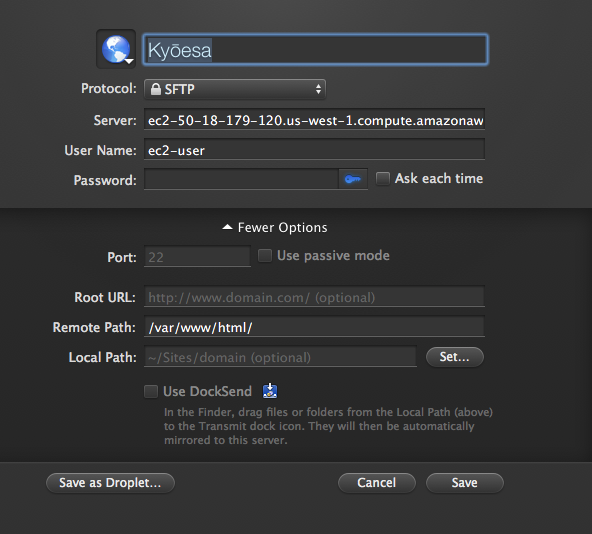
9) We are now ready to use an FTP client to populate our site with files. Launch Transit, click on the SFTP tab and then hit the + icon to see the full SFTP server login panel. Fill in the details as shown in the screen shot with your Amazom Web Server details. Next for the pasword field, drag and drop your keypair.pem file into the Password user area to register it as your server access key. Once you have entered all information, press the Save button. You may now drag and drop files from your desktop to the server by just clicking on the name in the Transit Start-up screen ort using the Transit menu located in the menubar.
10) Finally here a few other libraries you may want to install if they are not already installed by default, but otherwise, you are good to go at http://your_godaddy_name.com.
その他インストール:
SQL:
1. yum install mysql
2. yum install mysql-devel
3. yum install mysql-server
4. service mysqld start
5. mysql_secure_installation
RUBY:
yum install ruby
gem install rails
A few usage examples (eating our own dog food):